Target Engagement MILRAD Reticle:
The article below is from guest editor John Boyette of Trace Armory. For more on Trace Armory and John Boyette visit this link.
Target Engagement MILRAD Reticle
This article is the part of the basic portion of the Trace Armory Group’s. Mil-Dot Usage Class I have been teaching for the past two years with great success. The ability of my students to range, engage and drop targets need it before hunting, competitive shooting or LE/Military Sniping is just great to watch. I understand not all of us have the ability to go to a training class so I wanted to share some of the information I train people with. So you can become a better marksman in your endeavors.
The Miliradian reticle can be of great use to a shooter in engaging the target. The key is to understand how a Milrad can aid you in target engagement. The four basic options the Milradian reticle gives you is:
- Range finding
- Bullet drop compensating
- Windage compensating
- Mechanical offset aim points
We will talk about all four basic options the Milrad reticle gives you the shooter the ability to engage a target no matter what situation faces you. First we will start by range finding.
Range Finding with a Milrad Reticle
The two basic steps to range finding of a target are:
- To know the target size or the size of something near the target.
- The two basic formulae to find the targets range in their unit of measure.
The formulae are:
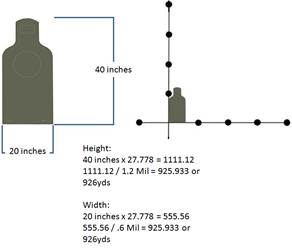
If you use meters as your unit of measure:
Width or height of target (meters) X 1,000 divided by the mil size of the target in the reticle = range in meters.
Width or height of target (in inches) x 25.4 divided by the mil size of the target in the reticle = range in meters.
If you use yards as your unit of measure:
Width or height of target (yards) X 1,000 divided by the mil size of the target in the reticle = range in yards.
Width or height of target (inches) x 27.778 divided by the mil size of the target in the reticle = range in yards.
Now this is good and all if you know the targets size, if so this process works. You can go long hand, use a calculator, or a Mil-Dot Master. All systems work just fine, it’s just a matter of speed and what you need.
The main issue that comes up is with targets that are not standing in on location all day long, not moving around or just popping in and popping out of your line of sight. How do we deal with this issue? Well we can set range cards off of the landscape in front of us. The distance to that blue car in front of you in the hide is 430yds, or the distance to that door is 231yds and so on. Make a range card and as target’s move back and forth around known distance landmarks we have there approximate range at least close enough for a human sized target to get engaged.
Well this process works just fine if you plan on staying in one location for an amount of time and have the security, time, and cover/ concealment to fill out your range card and sector sketch. What do you do in a liquid battle field where you move from point to point? With your inability due to time and motion of your unit to setup a range card and hunt a target of opportunity? What’s the next skill set to use?
The best way is to run a flash Milrad card. I use flash Milrad card sizes of 19 by 9 inch Milrad reference sheet just like the one below.
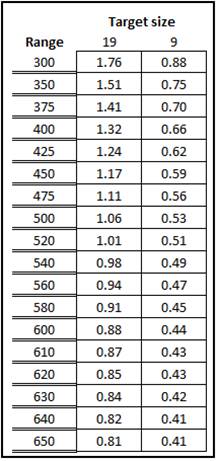
Target Engagement MILRAD Reticle Flash Card
The measurements of 19 by 9 inch are based on the average human’s width from shoulder to shoulder. Some use 20 inches as the old standby. But as the military has learned not all people are build the same. Some theaters of operations an 18 inch wide shoulder to shoulder measurement is more accurate than a 20 inch width. So a good average of 19 inches works for an 18 inch or 20 inch measured target under 500yds. The 9 inch measurement is the average side depth of a human. This is for a left or right side engagement of the target.
Using a 19 by 9 inch Mil reference sheet, you now have the ability to take a more precise flash mil reading of the reticle as you see the target in the area of engagement. To engage a target using the flash mil technique all you need to do is judge the targets width and see where the targets reading falls in the flash mil reference card. Once this is done, you have a good idea of the targets distance to you and you can adjust aimed fire to the right hold or ZERO distance. Keep in mind when using a .223/5.56mm or a .308/7.62mm caliber rifle the flash mil works best under 500yds.
Bullet Drop and Windage Compensating
To find what your bullet drop is at each range there is only one real way to do this. You must go shoot and record all data in a log book, a lot of people are running a ballistics program to get an idea of where the bullet will impact at. But the true data is in shooting at known distance. Always keep in mind your data that is logged in your logbook has nothing to do with your true bullet drop. Your data is 100% based on how well your riflescope tracks in its unit of measure. This is why you could have different data than other shooters on the same day engaging the same target shooting basically the same rifles and ammunition. What you are dealing with is two totally different riflescopes adjusting in there own way.
As you gain your data in what ever unit of measure your riflescope adjusts in. It would be a great idea to covert that dialed data to reticle hold data. IF you have an IPHY or MOA adjusted scope all you need to do is take your value and divide it by 3.438. By doing this you will convert the IPHY or MOA dialed data to a MILRAD value. Keep in mind that the value of 3.438 is how many true minutes of angle there are per-mil. So if you have an IPHY adjusted optic this will be off by about a 0.1 MILRAD per 0.9 MILRAD of data gained. Now you can use the MILRAD value for holds. This is also true for windage also.
Here is an example:
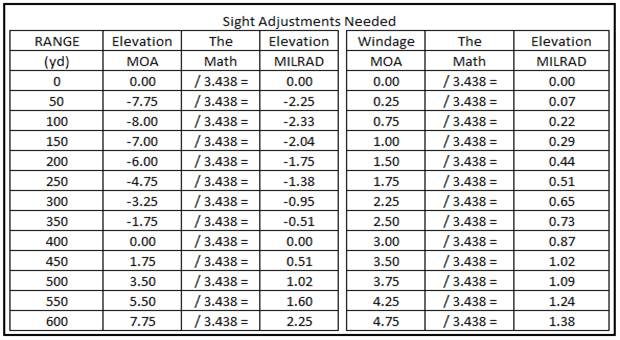
Target Engagement MILRAD Reticle Sight Adjustment Chart
As always these examples are just that, examples. You always need to go and shoot your dope, convert it and confirm it using dialed and hold data. Some people are starting to own .1 MILRAD, 1 cm, adjusted optics. These riflescopes adjust in a .1 MILRAD value, with a MILRAD reticle there is no conversion for you to do. Your dialed DOPE is the same as your HOLD DOPE, much easier and honestly a better system than using a two different unit’s of measure in one riflescope.
What if you the shooter decided to combine the ranging ability and the bullet drop characteristics of the MILRAD based reticle for target engagement all at the same time? What an idea. Everywhere I have been to be it a school, or reading always separates these two abilities of the MILRAD reticle. If you blend them you can engage targets much faster under 600yds. This is how it’s done.
As we have read we can use flash mil as a faster way to gain the targets range, and now we know what our mil hold is to known ranges using a dialed ZERO in the riflescope. The next step is to know what target size we will use. For the Military and LE Sniper we can go back to the 19 inch / 9 inch target size. For the competitor or hunter we need to find the right target size for our usage and we will cover these sizes later. But for now let’s work on the 19 inch / 9 inch flash mil.
With this information I can now adjust my 19”x9” MILRAD cheat sheet from 100 to 495yds. I can now say that if the target reads the width of 5.2 MILRAD to 1.05 MILRAD I can hold center mass with a 400yd ZERO and send the round down range. Now let’s see how this works. The bullets flight path is well within a 36 inch target from 0 to 495yds using a 400yd ZERO Point of impact. This is called danger space. Not so much danger space for you, it’s the targets danger space due to the ease of engagement. The bullets summit never reaches a maximum Ordinate of 18 inches “half of the targets height” above the line of site. The summit of my ballistic curve is between 200yds to 225yds and noted in the elevation in inches colored orange with a height above the line of site of 12.5 inches.
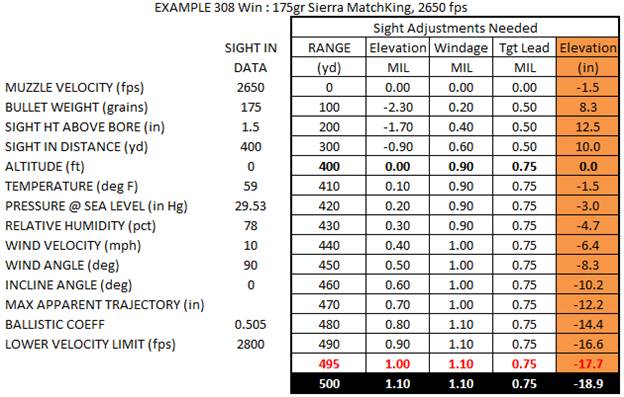
Target Engagement MILRAD Reticle
To put this in simple terms if I was shooting a human target running a 400yd ZERO and I aimed center mass and the target was at 215yds my bullet would hit below the chin. Not ideal but you take what you can get in a gunfight.
At this point my Milrad range card will read as follows:
This Milrad range card will help me engage targets at a faster pace than before with having hard data per distance and using the long math for mil range.
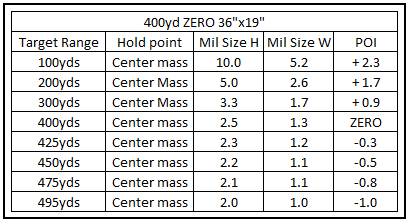
Milrad Range Card
One key here is this, just because you can get a center mass shot, does not mean you will have a kill with bullet impact or even take the target out of the fight. This technique for target engagement on a liquid battlefield as targets moves around pop-in, pop-out of the battle space. You will also see I have the Point of Impact “POI” listed. If I need to do a precision shot on a downed target. I have seen an Iraqi Fidayeen member take a burst from a M240B at 450m and go down and get back up again. IF your bullet does not strike a kill zone area there is no guarantee that the target will stay down. As in this target engagement a well placed burst fire made short order on a non-mobile target. When engaging targets with your SWS you may run in to the same situation. So having accurate hold point in your reticle wile using danger space is a critical task.
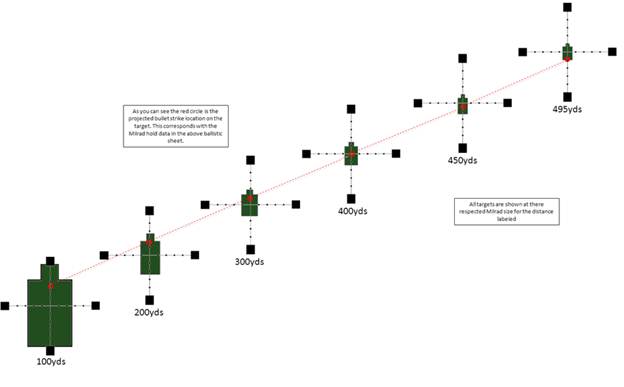
The next question is, well this is all good and all, but how about us target shooters out there that shoot in competitions? We can use the same framework of danger space but on a smaller target. I was just at the Practical Marksman Challenge II rifle match in Society Hill Alabama as a RSO. In this match I would say of the steel targets size, most where 2-3 MOA in size at unknown distance. The common sizes of steel targets where:
- 6” diamond shaped
- 18”x10” rectangle
- 12” diamond
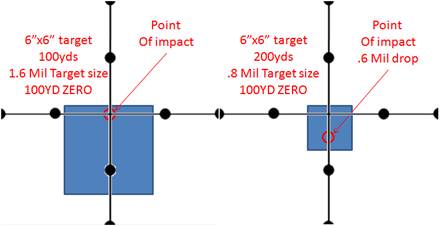
I would say most tactical competitive shooters run a 100yd ZERO, why I do not know but they do. So we will base a simple process of target engagement around a 100yd ZERO for the listed target sizes. I know that my 200yd Mil hold is .5 Milrad from 100yd ZERO, my 300yd Mil hold 1.3 Milrad from 100yd also. I can use this to my advantage to engage targets under time. The below picture explains how this works.
Lets say on a firing stage I have 45 seconds to engage a pistol target that is under 12 feet away, then go to a 6” diamond and a 12” square at un-known distance with two rifle shots each target.
Sounds hard? Come on down to the Practical Marksman Challenge rifle match and let me know. This was lane 16 I ran as a RSO. If I was a shooter the first step I would take is guess the near and far distance. I would say the 6” target is between 150yds and 250yds. If I know the size of a full Milrad in 100yd increments I have a fighting chance to get a hit on these targets within my timeline.
When the time starts I engage the pistol target hostler a hot safe pistol and load my rifle, then take a look at the target size. The first picture above is a 6” plate that reads more than 1 Milrad. I know a Milrad @ 100yds is 3.6” due to the target size I can hold a little off the 12 o’clock and see my 100yd ZERO to my 300yd hold point is covered by the target size in the reticle. This tells me that from 100yds to 300yds my DOPE for these distances are covered by the reticle. So I send the round down range and get a hit. In the first picture I have from 100yds to 300yds covered by target size. I assumed the target was between 150yds and 250yds the target covers both hold points. I will get a hit on this target.
Due to target size, the holds the target covers, I feel I can get a hit on this piece of steel. So I send it, with this target size of .8 Milrad I am at 200yds, I get a hit and make time and score.
What if the target is smaller? If you look at the second picture the target is smaller than 1 Milrad, since I know a Milrad at 200yds is 7.2” this makes since. By holding again off the 12 o’clock my 100yd, 200yd hold point of .5 Mil is covered by target size again. Keep in mind I have no real idea how far the target is. I am using the targets size and my hold points as a BDC. If I have holds that are covered up with steel and the target is within the distance that my holds are showing I get a hit.
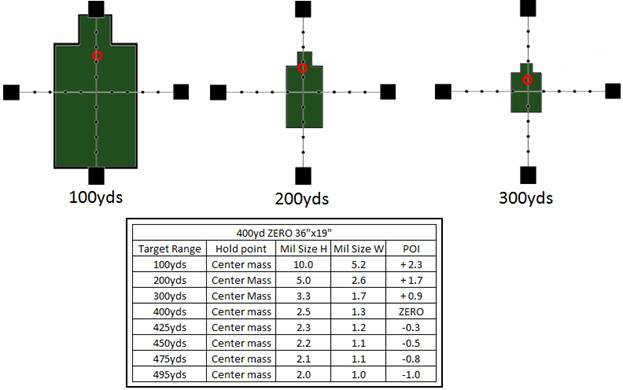
This type of danger space works and this is also how you can “see” your hits on a target. If you look at the below chart you will see the bullet placement matches the MILRAD hold location. At all ranges.
Mechanical Offset Aim Points
Mechanical offset is the difference between line of sight and line of bore. Most people call this sight height and this is correct if you are measuring for height of your rings to let your riflescope clear the barrel. But this same measurement will have your Point of Aim “POA” and Point of Impact “POI” have a shift between your near ZERO range and the rifles crown. If you need to take a precision shot short of your ZERO range you can do a hold off using your MILRAD reticle to make a precise bullet print on the target.
The process is simple. Take your known ZERO range 100yds, 200yds, 300yds or what ever you want to use and we will find where the bullet prints for ranges less than 100yds. The first step is to mark off 100yds in 10yd increments and place ten ½” and a 1” dot on the target board. Once done we will shoot a 3 rnd group at 100yds to confirm the 100yd ZERO is set at the 1” dot. Now we move to the 90yd line and take a shot holding center mass on the first ½” dot. If the bullet prints low or high you use your reticle to see the offset from aiming point to bullet hole and on the second shot use this hold to have the bullet print on the target. Once done move to the 80yd line and repeat the same process.
As you move down range you will see the bullet impact move away from the aiming point of the ½” dot. This distance between the target and the bullet print can be measured by your MILRAD reticle. So lets say your 40yd offset is 2.3 MILRAD low. As you see it on the target, all you need to do is hold over 2.3 MILRAD and send the next round to confirm that hold it’s that simple.
Now you have a shot at 40yds you know from 100yds you need to hold 2.3 Mil. Well if you have a 200yd ZERO dialed in and you need to take that 40yd shot what do you do now? These are the questions you need to have an answer for before you need to take the shot. These types of drills can keep a person very busy on a 100yd or 200yd range for a long time. There is a real need for a LEO Sniper to know his short range holds even under 10yds of distance. This simple drill is critical for the AR-15 family style of rifles due to there higher line of sight to line or bore measurements compared to a manually operated rifle.
These are just some of the many abilities a unit of measure in a riflescopes reticle can aid you in. Yes it is true; you can use a Minute of Angle reticle also. I hope this aids you in your shooting needs.
John Boyette
Owner and Instructor
Trace Armory Group
P.O. Box 184
Hillsborough, NC 27278
919-428-5265


