ASSEMBLE 308 AR UPPER FROM PARTS (STEP BY STEP GUIDE)

“How To Assemble an AR-10, 308 AR Upper” Tutorial with Detailed Pictures and Explanations
Build a DPMS LR-308 Upper Receiver with Free Float Handguard
Below is the steps taken for assembling the DPMS LR-308 Upper Receiver in the “Long Range Target Varmint Rifle 308 AR” project.
Tools Needed to Assemble an AR-10 308 AR Upper Receiver
Tools:
Click the links below for more info and purchasing sources.
- The “Claw” DPMS Upper Receiver Holding Fixture
- Barrel Nut Wrench – The barrel nut wrench is specific to the upper and handguard being utilized
- Free Float Handguard Strap Wrench
- Torque Wrench (optional)
- Grease
- Flat Head Screw Driver
- Roll Pin Punch
- Small Hammer
Parts Required to Assemble an AR-10, AR-308 Upper Receiver :
DPMS LR-308 Upper Receiver Parts
- DPMS 308 AR Stripped Upper Receiver
- DPMS 24 Inch 308 AR Heavy Barrel
- Fulton Armory Barrel Nut
- Fulton Armory Free Float Handguard
- 308 Front Sight Gas Block
- 308 Bolt Carrier Group
- Gas Tube
Step 1 – Prepare the AR-10, 308 AR Upper Receiver For Assembly
The first thing I did was to inspect every part and do a test run making certain all the parts fit as expected.

DPMS LR-308 308 AR Upper Assembled
Step 2 – Prepare the 308 Stripped Receiver
Mount the stripped upper to the “Claw” and insert the two retaining pins. The pins require a slight tapping from a hammer. They are tight by design. Now at this point most folks will do the smart thing and place the claw in a vise for the rest of the assembly. I don’t have a vise in my apartment so I will use the one at work a little farther down the page 🙂

DPMS 308AR Action Block

DPMS “Claw”
Step 3 – Install The .308 Barrel In The Upper Receiver
Installing the barrel is pretty straight forward. Be certain to clean the barrel extension and the mating hole in the upper receiver. I applied a thin layer of grease to the barrel extension to make future disassembly easier.

DPMS LR-308 308AR Barrel Installation
Slide the barrel in place and continue to assemble 308 AR Upper.

DPMS LR-308 308AR Barrel Installation
Be sure to orient the pin of the barrel extension with the groove in the threads of the upper receiver

DPMS LR-308 308 Barrel Installed
Step 4 – Install AR Barrel Nut
Apply grease to the threads. This to aid in the proper torque and future removal of the barrel nut. Typically a “Moly Grease” is used. This build I will be using the Militec-1 which is NOT a moly grease. I use the Militec for everything gun related.
Carefully hand tighten the barrel nut being sure not to cross the threads.

Grease reciever threads for barrel nut installation
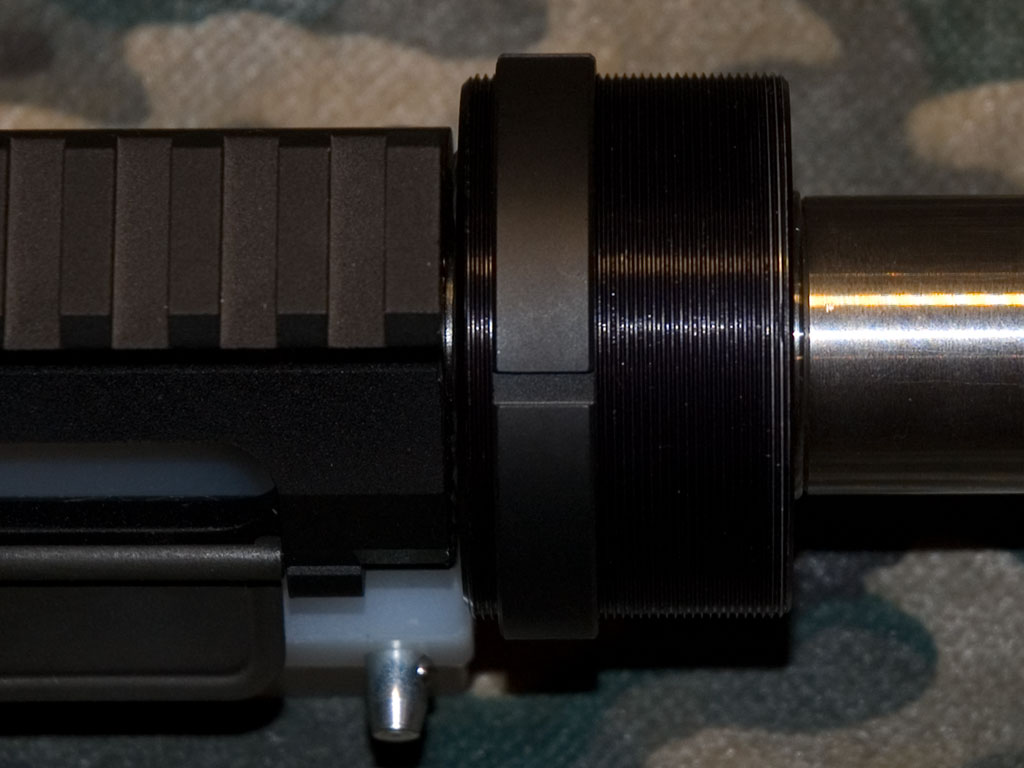

Step 5 – Torque AR-10, AR-308 Barrel Nut and Align Gas Tube
Here’s the part where a bench vise must be used. The DPMS claw needs to be placed very securely in the vise as it takes a fair amount of force to tighten the barrel nut the correct amount while maintaining proper alignment for the gas tube.
The general idea with tightening the barrel nut is not to tighten it all in one shot but rather tighten it in three or four attempts. With each attempt you will tighten, back off and tighten again getting the barrel nut to rotate a little farther and tighter with each attempt. You will notice that the barrel nut holes most likely do not line up with the hole in the upper receiver for the gas tube. This is a good thing. Your final step is to tighten the barrel nut one last time and align the nut so the gas tube can fit through the barrel nut and into the receiver.
Basically you need to rotate to the next hole carefully stopping when the barrel not hole aligns with the gas tube hole in the receiver. Most folks use the gas tube testing for alignment as they go. I use a drill blank the correct diameter. I find it less awkward to use then the gas tube. Because of the very short handle on my wrench I had to use a hammer to gently tap the barrel nut into position.
Note: There is torque specification. If your using a different barrel nut and a wrench that allow the attaching of a torque wrench use the above procedure and stay within the correct torque range. Also the length of your wrench significantly affects the amount of torque you are applying to the barrel nut. The longer the wrench the more torque you will be able to apply with less physical force. Don’t over tighten the nut or you can damage the receiver and possibly yourself.

DPMS LR-308 Tighten Barrel Nut


Align the barrel nut so the gas tube passes through the nut and into the lower receiver. In the image below you can see the rod visibly going through the barrel nut and into the receiver.

Step 6 – Install 308 AR Gas Tube
This part is easy, just make certain the bend in the gas tube is oriented correctly. Actual installation will take place when the gas block is installed.

DPMS LR-308 308AR GAS System Parts

DPMS Rifle Gas Tube


DPMS LR-308 Barrel Nut and Gas Tube

DPMS LR-308 Gas Tube Installation
Step 7 – Install 308 AR Front Sight Gas Block
This is another very easy step. The most important item to be concerned with is the orientation of the holes in the gas tube. The gas tube contains three holes. One hole aligns with the hole in the barrel. That hole is how the gas is able to get into the tube to assist with cycling the rifle. The other two holes will be aligned to each other horizontally. These two holes are for the roll pin the captures the gas tube within the gas block.
AR15 308AR Gas Tube Ports

DPMS LR-308 308AR Gas Tube Orientation

DPMS LR-308 308AR Gas Port
Place the correctly oriented gas tube into the gas block. Use a roll pin punch and small hammer to drive the roll pin flush with the gas block.

DPMS LR-308 Gas Block


Carefully slide the assembled gas block over the barrel. Notice are barrel has two small conical recesses machined into it. Those recesses are for the gas block set screws. They serve to lock the gas block in place and prevent it from rotating. The gas block will stop at the correct location due to the point where the barrel is a larger diameter. At this point I turn the upper receiver upside down so the picatinny on the upper and the gas block are resting on a perfectly flat surface. This aligns them perfectly to the same plane. Then carefully tighten the two set screws being careful not to move the gas block.

DPMS LR-308 Assembled Front Sight Gas Block

DPMS LR-308 Gas Block


Assembled it should look like this.

DPMS LR-308 Gas Block Assembled


Step 8 – Install 308 AR Free Float Handguard
This step takes a little bit of fussing to get the handguard properly oriented so the bottom picatinny rail is square 180 degrees of the receivers picatinny. Once again I used some flat surfaces to square things up. Some guys mount a 12″ rail to the top of this handguard then use a special tool from Brownells to hold the picatinny’s inline and square while the handguard’s locking ring is tightened.

Fulton Armory Titan Free Float Handguard
Step 9 – Install 308 AR Picatinny Rail
Two screws- Done. This was actually installed earlier to aid with aligning the handguard.

DPMS LR-308 Fulton Armory Picatinny
Step 10 – Verify Safe Headspace
Headspace is beyond the scope of this page. Consult a gunsmith or someone else qualified to verify proper headspace
Step 11 – Install 308 AR Bolt Carrier Group
No Explanation needed.
Assemble 308AR Upper From Parts

Links to Other 308 AR | AR-10 | AR 308 Content
Manufacturers | 308 AR Compatibility | Charging Handles | Carbon Fiber Barrels| Barrels | AR Rifle Build Guides | AR Receiver Selection Guide | Trigger Selection Guide | Bolt Carriers | Armalite AR-10 Rifle Parts | AR-10 Rifle Barrel Selection Guide | 308 Scope Selection Guide | Tools | Scope Mounts |
308AR Supporters


